Volt & Velo

Fixing a Flat on an E-Bike

A front flat is an ordinary bicycle job. A rear flat on a hub-motor bike is not — there is a motor cable attached to the wheel you are about to remove. Here is the difference, what a shop will and will not do, and how to stop having them.

By Stephen V.Last updated How we pick

The honest verdict first. Prevention is the answer for most value e-bike owners, because a rear flat on a hub-motor bike is a genuinely awkward job at the side of a road: the wheel you need to remove has a motor cable attached to it, the tire is heavier and tighter than a bicycle’s, and there is a torque arm and a specific washer order to put back correctly. A puncture-resistant tire with a real protection belt, kept at the right pressure, removes most of the problem for the price of one shop visit.

A front flat, for the record, is an ordinary bicycle repair on almost every bike on this site, because the motor is in the rear wheel. If you are standing at the roadside right now with a front flat, skip to the step-by-step; it is twenty minutes and you need levers, a tube and something to inflate with.

What is below, in order: why the rear wheel is different, the step-by-step for each wheel, what to expect if you take it to a shop, and the three things that prevent flats — the right tire, the right pressure, and finding what caused the last one. The four picks are the tire that stops punctures, the tool to carry, something to inflate a fat tire with on the road, and the floor pump that keeps pressure right at home. We have not run laboratory puncture tests; here is exactly what we do instead.

How this is funded:we earn a commission if you buy through our links, at no extra cost to you. It never changes which product we recommend, and we’ll tell you plainly when to skip one. Full disclosure.

Quick picks

Ranked on published specs, price and buyer fit. Select a row to jump to the full write-up. We have not ridden every one of these — here is exactly what we do instead.

#ProductBest forPrice
1
Schwalbe Marathon Plus

Schwalbe Marathon Plus

The flat-killer. Schwalbe's 5 mm SmartGuard belt earns the top 7-of-7 on their own puncture scale, and main sizes are e-bike approved to 50 km/h. It rolls a touch slower and it's a wrestle to fit, but if you're tired of roadside flats on a commuter, nothing else comes close.

Stop having flats at all
$57.86 · View on Amazon

$64.9911% off

Price as of October 5, 2026. #ad How we’re funded

2
ROCKBROS 20-in-1 Bike Multi-Tool

ROCKBROS 20-in-1 Bike Multi-Tool

The best all-round pick for a new e-bike owner: hex keys for the bolts that come loose in the first month, plus tire levers for the flat you will eventually get, in something that lives in a jersey pocket or a saddle bag.

Levers and hex keys to carry
$14.99 · View on Amazon

Price as of October 5, 2026. #ad How we’re funded

3
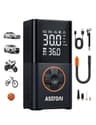
AstroAI L7 Cordless Tire Inflator

AstroAI L7 Cordless Tire Inflator

The one that lives in the pannier. Inflating a 4-inch fat tire by hand is genuinely tiring, and a cordless compressor turns a roadside flat from a chore into a two-minute stop. It does car tires too, which is how most people justify it.

Inflating a fat tire roadside
$23.99 · View on Amazon

$39.9940% off

Price as of October 5, 2026. #ad How we’re funded

4
BV Steel Floor Pump with Gauge

BV Steel Floor Pump with Gauge

The value standard. A steel barrel, a gauge you can read from standing, and a reversible head that takes Presta and Schrader without an adapter — which matters because e-bike tubes are usually Schrader and everything else you own probably is not.

Correct pressure at home
$23.99 · View on Amazon

Price as of October 5, 2026. #ad How we’re funded

The picks in full

#1Stop having flats at all

Schwalbe Marathon Plus

The flat-killer. Schwalbe's 5 mm SmartGuard belt earns the top 7-of-7 on their own puncture scale, and main sizes are e-bike approved to 50 km/h. It rolls a touch slower and it's a wrestle to fit, but if you're tired of roadside flats on a commuter, nothing else comes close.

What you get

  • 5 mm SmartGuard belt — Schwalbe's top 7/7 puncture rating
  • E-bike approved to 50 km/h in main sizes
  • Long tread life

Trade-offs

  • Heavier and slower-rolling than a race tire
  • Notoriously stiff to mount the first time
Key spec5 mm SmartGuard puncture belt; 7/7 puncture protection; e-bike approved
Best forAll-but-eliminating flats on a commuter

Specs read from the manufacturer or retailer listing, on July 22, 2026. “Not published” means the maker does not state that figure.

#2Levers and hex keys to carry

ROCKBROS 20-in-1 Bike Multi-Tool

The best all-round pick for a new e-bike owner: hex keys for the bolts that come loose in the first month, plus tire levers for the flat you will eventually get, in something that lives in a jersey pocket or a saddle bag.

What you get

  • Hex keys and tire levers in one pocketable unit
  • Covers the re-torque checks a new boxed e-bike actually needs
  • Cheap enough to leave permanently in a pannier

Trade-offs

  • Folding multi-tools give poor leverage on a tight bolt
  • No torque measurement — a multi-tool cannot tell you when to stop
Key spec20-in-1 multi-tool with hex keys and tire levers
Best forThe tool to carry on the bike

Specs read from the manufacturer or retailer listing, on August 18, 2026. “Not published” means the maker does not state that figure.

#3Inflating a fat tire roadside

AstroAI L7 Cordless Tire Inflator

The one that lives in the pannier. Inflating a 4-inch fat tire by hand is genuinely tiring, and a cordless compressor turns a roadside flat from a chore into a two-minute stop. It does car tires too, which is how most people justify it.

What you get

  • Cordless — no floor pump, no car socket, no cable
  • 150 psi rating covers bike, car and sports-ball duty
  • Far less effort than hand-pumping a high-volume fat tire

Trade-offs

  • Another lithium battery to keep charged
  • Compressors are loud and slower than a floor pump on skinny tires
Key specCordless electric inflator, 150 psi rating
Best forFat tires, roadside repairs and people who hate pumping

Specs read from the manufacturer or retailer listing, on August 18, 2026. “Not published” means the maker does not state that figure.

#4Correct pressure at home

BV Steel Floor Pump with Gauge

The value standard. A steel barrel, a gauge you can read from standing, and a reversible head that takes Presta and Schrader without an adapter — which matters because e-bike tubes are usually Schrader and everything else you own probably is not.

What you get

  • Reversible Presta/Schrader head — no adapter to lose
  • Steel barrel rather than the plastic used at the very bottom of the market
  • 160 psi rating covers everything from fat tires to road tires

Trade-offs

  • Dial gauge is accurate enough for tires, not for fine-tuning a 20 psi fat tire
  • Floor pumps live in the garage; you still want something portable for the road
Key specSteel floor pump, 160 psi, reversible Presta/Schrader head with gauge
Best forThe home floor pump most riders should buy

Specs read from the manufacturer or retailer listing, on August 18, 2026. “Not published” means the maker does not state that figure.

Why a rear hub-motor wheel is a different job

Four things change compared with a bicycle.

There is a cable attached to the wheel.The motor’s power and sensor wires leave the axle and run up the frame to the controller. On many value e-bikes there is an inline connector a few inches along that cable, which you unplug before the wheel comes out; on others the cable runs further and you work with the wheel still tethered. Either way the rule is the same: never let the wheel hang by that cable, and never pull on it to separate a connector.

The axle hardware has an order. A hub motor sits in the dropouts with washers, often a flat anti-rotation washer with a tab, and on most bikes a torque arm bracket that stops the axle spinning under power. Photograph the whole assembly from both sides before you take anything apart. Putting the torque arm back upside down, or leaving a tabbed washer out, is how a wheel works loose under power later.

Everything is heavier and tighter.A motor wheel is awkward to handle one-handed, a 20 x 4 fat tire bead is a genuine wrestle, and a puncture-resistant tire is harder still to mount the first time — which is the price of not having flats. Plan on proper tire levers rather than a key and optimism.

The electrics come off first.Remove the battery before you start working on the bike. It makes the bike lighter, it removes any chance of the motor driving while your hands are near the wheel, and it follows the general principle in the CPSC’s micromobility guidance of not working around a connected lithium pack. If you are at the roadside, get the bike off the carriageway first — NHTSA’s bicycle safety guidance on being visible applies most when you are stationary and distracted.

Step by step: the front wheel

This is a normal bicycle repair. Release the brake if it is a rim brake, undo the quick release or axle nuts, and lift the wheel out — mind the disc rotor, which bends if you lean the wheel on it. Lever one side of the tire bead off the rim, pull the tube out, and find the cause before you fit anything new: run a finger carefully around the inside of the casing for the thorn, glass or wire that is still in there. Fitting a new tube over the thing that killed the last one is the most common mistake in this job.

Patch or replace the tube, seat it with a little air in it so it is not twisted, work the bead back on by hand as far as possible and only then use levers, inflate to the pressure range printed on the sidewall, and refit the wheel. Check the brake still centres and the rotor is not rubbing before you ride.

Step by step: the rear wheel with a hub motor

Battery off. Bike supported so it is not resting on the display, the levers or the derailleur — a workstand if you have one, otherwise on its side on something soft, drive side up.

Photograph both dropouts. Shift to the smallest cog to slacken the chain. Undo the brake if needed, then release the torque arm from the frame, noting its orientation. Find the motor cable’s inline connector and separate it by gripping both halves of the connector, never the cable. Now undo the axle nuts and keep the washers in the order they came off — put them on a rag in sequence, not in a pocket.

With the wheel out, the tire work is the same as the front: find the cause, patch or replace, seat the bead by hand before levers, inflate to the sidewall range. Refitting is where care pays: the axle must sit fully home in both dropouts, the tabbed washers must engage, the torque arm goes back the way it came off, and the axle nuts need to be properly tight — this is the one fastener on a value e-bike that absolutely must not be left hand-tight. Reconnect the motor plug, make sure the cable is routed with slack and secured so it cannot catch the cassette or the rotor, refit the battery, and test at walking pace before you ride properly. Re-check the axle nuts after the first few miles. Our assembly guide covers the re-torque habit in general, and it applies doubly here.

What a shop will do, and what it may refuse

Call before you ride or drive anywhere. Two things to ask: do you work on hub-motor e-bikes, and what do you charge for a rear e-bike flat. Some independent shops decline electric bikes they do not sell, particularly direct-to-consumer and Amazon brands, because of liability and parts availability. Many that do take them charge more for an e-bike flat than a bicycle flat, for the straightforward reason that it takes longer.

We are not going to publish a price for that work, because it varies by city and shop and anything we wrote would be stale and wrong. What we can tell you is the comparison to make: get the rear-flat price from two local shops, then look at the live price of a puncture-resistant tire on this page. For a lot of riders the second number is smaller than two visits, which is the actual argument for prevention over repair.

Prevention 1: a tire with a real protection belt

Puncture resistance is a structural feature, not a tread pattern. The Schwalbe Marathon Plus uses a 5 mm belt under the tread and earns the top 7-of-7 position on Schwalbe’s own puncture scale, with main sizes approved for e-bike use to 50 km/h. You pay for it in weight, in rolling resistance and in a genuinely difficult first fitting. On a commuter that has had two flats, it is the best money on the bike.

Two caveats we would rather state than skip. It is sized for conventional tires, so fat-tire folders running 20 x 4 are not in its range — our tire roundup covers the fat options, which have less protection and shorter tread life. And no tire stops a sidewall cut or a pinch flat from a pothole at low pressure, which brings us to the next section.

Prevention 2: pressure, which causes more flats than glass

The classic pinch flat happens when an under-inflated tire compresses onto the rim over an edge and the tube is cut between the two. It is the most common flat on a heavy bike, and it is entirely preventable with a pump and two minutes a week.

Use the range printed on the sidewall, not a number from the internet, and remember that an e-bike is carrying more weight than the same tire on a bicycle, so the lower end of the range is less generous than it looks. Fat tires are the subtle case: they run at low pressures where a few psi is a large proportion of the total, and a cheap gauge cannot resolve it. Our tire pressure guide is the detailed version, and it is the single highest-return five minutes of maintenance on a value e-bike.

Prevention 3: find out what caused it

Every flat has a cause and most of them are still in the tire. Before you fit a tube, run a rag or a careful fingertip around the inside of the casing, inspect the tread for anything embedded, and check the rim tape covers every spoke hole — a displaced rim tape causes repeat flats that look mysterious. If you get two flats in the same spot, it is the rim tape or something still in the casing, not bad luck.

Two extras worth knowing. Tire sealant works well on small thorn punctures and does nothing for a slash or a pinch; it also makes a later patch repair messy. Tire liners are a cheap way to add protection to a tire you already own, at the cost of some weight and the risk of chafing if fitted carelessly. Neither is as good as the right tire, and both are better than nothing on a bike whose tire size has no protected option.

What to carry

For a bike you ride daily: a multi-tool with real tire levers, a spare tube in your size (write the size on the packet), and something to inflate with. On a fat tire, hand-pumping 4 inches of tire volume is miserable enough that a small cordless inflator is the difference between fixing a flat and calling someone — and it does car tires too, which is how most people justify it. Our pump and inflator roundup covers both, and our tool kit roundup covers the home set that makes the rear-wheel job much less unpleasant.

And know your limits honestly. If the bike has a rear hub motor, you have never had the wheel out, and it is dark and raining, the right answer may be a ride home and a workstand tomorrow. That is not a failure; it is the same decision a mechanic would make.

Frequently asked questions

Is fixing a flat on an e-bike different from a normal bike?

The front wheel is the same job on almost every e-bike, because the motor is in the rear. A rear flat on a hub-motor bike is different: the wheel has the motor's power and sensor cable attached to it, there is usually a torque arm and a specific washer order to reinstall correctly, and the wheel and tire are heavier and tighter to work with. Photograph both dropouts before you start and never let the wheel hang on its cable.

Can I fix an e-bike flat myself?

Yes, with tire levers, a spare tube, something to inflate with and some care. Remove the battery first, support the bike so it is not resting on the display or levers, and if it is the rear wheel, photograph the axle hardware before disassembly. The parts people get wrong are the washer order, the torque arm orientation and leaving the axle nuts less than properly tight.

How much does an e-bike flat tire repair cost?

It varies by city and shop, so ask two local shops rather than trusting a figure online — including ours. Expect a rear e-bike flat to cost more than a bicycle flat because it takes longer, and ask whether the shop works on hub-motor e-bikes at all, since some decline brands they do not sell. Compare their price with the cost of a puncture-resistant tire; for many riders the tire is cheaper than two visits.

What is the best puncture-proof tire for an e-bike?

Of the tires we list, the Schwalbe Marathon Plus: a 5 mm belt under the tread, the top 7-of-7 position on Schwalbe's own puncture scale, and e-bike approval to 50 km/h in main sizes. The trade-offs are weight, slower rolling and a stiff first fitting. It is sized for conventional tires, so 20 x 4 fat-tire folders need a different option with less protection.

Why do I keep getting flats in the same place?

Because the cause is still there. Two flats in one spot is almost always either something embedded in the casing that you did not find, or rim tape that has slipped and left a spoke hole exposed. Run a fingertip carefully around the inside of the tire, inspect the tread, and check the rim tape covers every hole before fitting another tube.

Will tire sealant work on an e-bike?

On small thorn and wire punctures, yes. On a sidewall cut or a pinch flat from hitting an edge at low pressure, no — and those are the most common flats on a heavy bike. Sealant also makes a later patch repair messy. It is a reasonable supplement if your tire size has no puncture-protected option, and no substitute for correct pressure.

Sources

Keep reading