1. The switches, the key, and the two-button problem
Almost every value e-bike separates “the battery is on” from “the bike is on.” The pack usually has its own power button, often with a four-LED charge gauge beside it, and frequently a key that has to be turned to an on position before anything downstream gets power. The display has its own button, sometimes needing a long press rather than a tap.
So: turn the key fully, press and hold the button on the pack, confirm its own LEDs light, and only then try the display. If the pack’s LEDs do not light at all, the problem is upstream of the bike entirely and you can ignore the whole bike for now. If the pack lights and the display does not, the problem is between them — which is sections 2 and 4.
2. Seating and contacts: the most common real fault
A removable pack slides onto a cradle and makes contact through a set of blade or pin terminals. Three things go wrong there, and all of them are cheap.
It is not fully home. Most cradles need a firm push until something clicks and the lock engages. A pack sitting a few millimetres short looks completely normal and makes no electrical contact. Take it off and refit it deliberately.
The contacts are dirty or corroded. This is what a winter of road salt does, and it is why our winter gear pagemakes a point of keeping water away from the terminals. Look for green or white deposits or road grit. Clean with the pack off the bike, with a dry brush or a contact cleaner made for electronics — not with water, not with sandpaper, and not with anything conductive.
A terminal is bent or pushed back. Compare the two sides and look for one blade sitting lower than its neighbours. A bent cradle terminal usually needs the part rather than a bodge, and it is a warranty conversation if the bike is new.
3. The charger, which fails more often than the battery
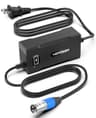
Budget e-bike chargers are the least robust part of the whole system, and a failed one presents exactly like a flat battery: you plug in, nothing happens, the pack goes flat and the bike will not turn on. Before you buy a battery, prove the charger.
What to look at: does the charger’s own LED behave the way the manual says — usually red while charging, green when complete? A unit that shows “complete” the instant you plug it into a flat pack is a prime suspect. A charger with a voltage display is genuinely useful here because you can watch whether the pack voltage is rising at all, which is the one measurement that separates a charger fault from a pack fault without a multimeter.
If you replace it, match the system first. A 48 V (13S) pack charges to about 54.6 V; a 36 V (10S) pack charges to 42 V. The two are not interchangeable in either direction, and putting a 54.6 V charger on a 36 V pack is a genuinely dangerous mistake rather than just a non-functional one. Check the connector too — 3-pin XLR is the common value-e-bike port, but it is not universal. Our charger roundup covers both voltages and the one genuinely UL-listed unit we have found.
4. Display and controller connectors
If the pack lights up and the display stays black, suspect the connection between them. The display plugs into a cable that runs down the bars into the frame; a tug on the bars during transport, a pressure wash, or a crash can part it or let water into it.
Work gently. Trace the display cable to its first connector, separate it by gripping the two connector halves — never the cable — look for green corrosion or bent pins inside, then push it firmly back together until it seats. While you are there, check the brake cut-off connectors and the pedal-assist sensor plug, because they live in the same loom and the same water gets into all of them. Do not start cutting or splicing wiring on a bike under warranty.
5. The pack: deep discharge, and a BMS that has gone to sleep
Every lithium pack has a battery management system, and part of its job is to disconnect the output when cell voltage falls too low. A pack that was stored flat over the winter can drift below that threshold, at which point it will appear completely dead and may refuse to accept a charge — the BMS is protecting cells that are already too low to be charged safely.
Sometimes connecting the correct charger for a while wakes it: some BMS designs need to see charge voltage before they re-enable the output. It is worth one attended attempt with the right charger. If there is no response, that pack needs a specialist or replacing, and this is the scenario our winter storage guideexists to prevent — store it indoors at roughly half charge and check it every four to six weeks.
Two related notes. Cold alone can make a pack refuse to work or charge; bring it to room temperature before you judge it. And do not open a pack to “check the cells.” There is no user-serviceable part inside, the voltages are dangerous, and puncturing a cell is the one failure that turns a repair into a fire.
6. It turns on but will not move
That is a different fault and a better one, because it means power is reaching the display. The usual suspects, in order: a brake cut-off sensorstuck or misaligned, which tells the controller you are braking and inhibits the motor — squeeze and release both levers and look for a lever that is not returning fully; the bike being in a walk or zero-assist mode; a disconnected pedal-assist sensor, which on a pedal-assist-only bike means no power until it is reconnected; or a throttle plug that has come apart.
If none of that is it and the display shows an error code, look the code up in your manual before you buy anything — codes distinguish a hall sensor fault from a controller fault from a throttle fault, and that is the difference between a cheap repair and an expensive one. Our maintenance checklist covers the brake and sensor alignment checks that prevent most of this.
7. After rain, after washing, or after the bike was stored wet
“It stopped working after I washed it” is one of the most common versions of this problem, and the cause is almost always water in a connector rather than a drowned motor. Do not keep pressing buttons while it is wet. Remove the pack, dry the contacts and the cradle, separate and dry the connectors you can reach safely, and leave the bike somewhere warm and dry for a day before trying again.
Prevention is mostly about how you clean it: hose on low pressure or a bucket and sponge, never a pressure washer, and never aimed at the battery cradle, the controller or the display. The IP ratings on value e-bike listings describe splash and rain resistance, not immersion or a jet. Our riding in the rain guide covers what those ratings actually promise.
When to stop and what it is worth fixing
Stop and call the maker if the bike is in warranty — opening the loom or swapping parts yourself can end that conversation. Stop and get a shop involved if you have reached the controller, if the display shows a motor or controller error code, or if any part of this involves cutting wires.
And do the arithmetic honestly before you repair. On a value e-bike the battery is the most expensive component by a wide margin, and a replacement pack plus a charger can approach the cost of a complete new bike at the bottom of the market — which is the comparison our under-$500 page and battery lifespan guide set out. A dead charger is always worth replacing. A dead pack on a bike you like is usually worth it. A dead controller on a four-year-old bike from a brand with no parts channel often is not, and knowing that before you start spending is the point of working in order.